Popup Maker
Meet the most effective Popup Maker for Divi! Create amazing popups and display them on your Divi site using advanced triggering settings. The Popup Maker adds a new custom post type to your WordPress dashboard where you can design popups using the Divi Builder. Thanks to the beautiful user interface, the popup maker settings are intuitive and easy. Create high converting unlimited popups with various features in just a few minutes that fit all your marketing needs. Transform your traffic into leads, sales and signups with the Divi Pixel Popup Maker.

Popup Maker CPT
The Divi Pixel Popup Maker adds a new custom post type (CPT) to the WordPress Dashboard, where you can create a new post, design the popups using the Divi Builder, and customize the popups using the Popup Maker settings. The Popup CPT displays all popups added. On the main Popup CPT screen, you will find the popup title, CSS ID selector, popup status, and triggering type.
- Popup Maker CPT
- Popup Title
- CSS ID – can be used on element to trigger popup manually
- Status – Active/Inactive
- Triggering – shows the triggering method selected in the popup

Single Popup Interface
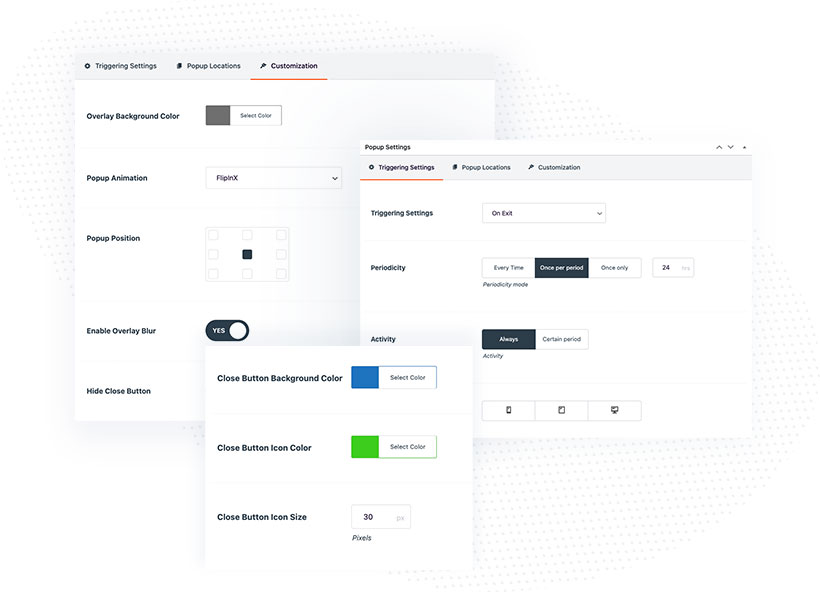
On the single Popup Maker screen, you will find the Divi Builder block, where you can design a popup and the Popup Settings meta box with all options for customizing. The Popup Settings interface is divided into 3 tabs: Triggering Settings, Popup Locations and Customization.
- Divi Builder – this is the place where you can design your popup layout
- Popup Settings – in this tab you can configure popup settings

Triggering Settings
In the Triggering Settings tab, you can set when the popup will be displayed, add a Closing CSS selector, and Remove the Link from the element with a Custom CSS Selector (so it will only open the popup, instead of reloading the page after the element is clicked). There are also a few other settings that you can enable/disable, like Close on Overlay Click, and Prevent Page Scrolling.
Manual Trigger
If you want to use Manual Trigger, then Trigger Event should be set to None. Manual Trigger allows you to trigger the popup after the element with selector added is clicked. You can use the default CSS ID that is generated automatically for each popup, or you can add Custom CSS Selector.
- Set Trigger Event to None
- Copy the Manual Trigger CSS ID
- Paste the CSS ID in module settings to the CSS ID field (Advanced → CSS ID & Classes)

If you want to trigger a popup with Custom CSS Selector, then you can add CSS ID “#my-popup” or CSS Class “.my-popup” to the Custom CSS Selector field. Depending on what you have used, you need to add CSS Class or ID to the appropriate field in the module where you want to trigger the popup. The CSS ID & Classes settings can be found in all modules (Advanced → CSS ID & Classes).

On Load
If you want to open a popup on page load, you can use the On Load trigger. This allows you to set Start and End Delay. The Start Delay is the time after that the popup will be opened. End Delay (if defined) will close the popup after the defined time (in a sec). All Trigger Events, except Manual Trigger, have also Periodicity and Activity settings available, which will be explained in the further part of this article.

On Scroll
On Scroll Trigger Event allows you to display a popup after the user scrolls the page a specific amount, which can be defined using pixels pr percentage. If you set 300px, the popup will be displayed after the user scrolled 300px down, after the page is loaded.

On Exit
Boost conversions with Exit Intent popups to reach out to the user one last time before they leave your website. This Trigger Event will display a popup after the user reaches the browser toolbar to close the window.

On Inactivity
Target visitors with automated inactivity detection and convert them into subscribers. This Trigger Event will open the popup after inactivity, which can be defined in seconds. If you add the 20s, then a popup window will be opened after 20 seconds of user inactivity.

Periodicity
Periodicity settings allow you to define how often the popup will show up. You can select Every Time which will open the popup every time after the page is reloaded on the Trigger Event you have selected. Once per period option allows you to define time in hours. If you define 24 hours, then the popup will be opened once per 24 hours. Once only option will open the popup only once.

Activity
This setting allows you to define if the popup should be always displayed, or by a certain period. When Certain Perion is selected you can define the exact days and time when the popup is displayed using the built-in calendar.

Popup Locations
In the Popup Locations tab, you can configure where the popup will be displayed. You can display popup by user role, or site area. In this section, you can select to display a popup on specific pages, or posts, or exclude specific pages and posts from displaying the popup. If you want to display popup globally, on all pages and posts, then select the Sitewide option.

Customization
In the Customization tab you can configure popup overlay, animation, position, add overlay blur and customize the close button which can be hidden, or placed inside the popup on specific devices. The close icon has controls for background and icon color, padding, margin and border radius.

How to add a new popup
To add a new popup, simply login to your WP Dashboard, navigate to Popup Maker CPT and Click “Add New”. This will open a new window where you can design the popup layout and configure all Popup Maker Settings.
- Click Popup Maker in your WordPress Dashboard
- Click Add New

- Add Title to your popup
- Click Use The Divi Builder button to enable Divi Builder
- In Build from Scratch modal window click Start Building

Now you are ready to start designing your first popup. You can select any column number and add any modules you want. The important thing is to define section width and max-width (to prevent the popup from going out of the screen on smaller resolutions). In most cases, you will also want to change the default row width to 100% to remove the left and right spacing from the content.
- Open Section settings
- Navigate to Design → Sizing
- In Sizing toggle set section width to meet your requirements
- Set Max Width to 90-100%, so the popup will not go out of the screen on smaller devices

The last step is to configure your popup: select Trigger Event, Popup Locations and setup Customization options, like add Overlay Background, select popup position, animation and customise close button. These all settings can be found in the Popup Settings meta box.

Export/Import
You can download prebuilt popup templates directly from the Divi Pixel website. These templates are fully pre-configured and provide a seamless starting point for designing your own custom popups. Simply import them and get started effortlessly!
If you purchased the plugin from the Elegant Themes marketplace, you can easily download all demo samples directly from your Elegant Themes account.
- Login to My Account and click on Demo Sections button located at the bottom
- On downloads page, find Popup Maker and click Download button

The download file is in .zip format, so you need to extract it. You will find 40+ popups .mxl files inside, and one master file with all popups included. If you want to import only 1 popup, then import only appropriate .xml file. If you want to import all popups from our demo page, then import master file.
- In WordPress dashboard, navigate to Tools → Import
- On the next screen click Run Importer link

- Select the dp-popup-demo.xml file
- Click the Upload file and import button
- Create new user or assign import to the current user
- Select Download and import file attachments checkbox
- Click Submit button

Once you’ve imported the popup template, go to the Popup Locations tab to customize the settings according to your needs. To make the popup visible across your entire website, select the Sitewide and All Pages options.

Divi Pixel features a built-in exporter that makes it easy to export selected items from the Popup Maker custom post type.
- In your WordPress dashboard navigate to Popup Maker tab
- Select the items you would like to export
- From the dropdown menu, select Export Popup option
- Click Apply button

NOTE: If you are experiencing styling issues, where the popup is not displayed correctly on front-end, then make sure to clear Static CSS File in Divi → Theme Options → Builder → Advanced. This step is required, even when this option is disabled. In that case, enable that and click Clear button.
